
Ortus DataBoss Dynamic Administrator
Ortus DataBoss is an application that will help you manage CFML Object Relational Mapper (ORM) objects without the need of writing administrative code for them; thus a Dynamic Administrator. DataBoss will talk to the underlying ORM engine (Hibernate) and get all the necessary information to manage all the ORM entities and its relationships in that specific CFML application DataBoss has been deployed to. DataBoss will accelerate your project development by giving you first hand knowledge about your entity structures, data, relationships and also help you administrate their data content for you. We have also added the capability to influence the UI by adding non-intrusive metadata to your ORM entities so it can produce labels, help text, textareas, passwords, rich text editors, data pickers and much more.
DataBoss
Flavors
Ortus DataBoss comes in two different flavors:
- Standalone : Standalone application deployable under any existing application or framework
- Module : A ColdBox module pluggable into ANY ColdBox 5+ application
Important : Each flavor comes compiled for each of the supported CFML engines (ACF, Lucee).
Requirements
- Adobe ColdFusion 11+
- Lucee 5.3+
- ORM Enabled application
Features In A Nutshell
- Download as a standalone application that can integrate with any framework or application
- Download as a ColdBox module so it can integrate with any ColdBox 5+ application
- Automatic Hibernate ORM entity detection and analysis
- Ability to manage all supported Hibernate relationships: One-To-Many, Many-To-One, One-To-One, Many-To-Many
- Ability to manage multi-level inheritance relationships
- RESTful export for entities as JSON,JSONP, XML, WDDX and PDF
- Internationalized and localized for: English, Spanish, German, French, Portuguese, and Italian
- Ability to create/edit/delete and multi-delete any managed entity and its data
- Built-in form validation based on ColdBox Validation and ORM metadata
- Customizable validation rules
- Customizable HTML 5 controls for persisted properties: Checkbox, Radio Buttons, Multi-Select, Text, Email, URL, Password, Textarea, Super Lite Rich Text Editor, Date/Time Picker
- Ability to paginate entity records and do inline filtering/sorting of data
- Easily interface layout overrides if ran as a ColdBox Module
- Easily extend the custom CSS framework
- Ability to reload the ORM engine a-la-carte
- Application responsive design ready for phone and tablet usage
- Database null support
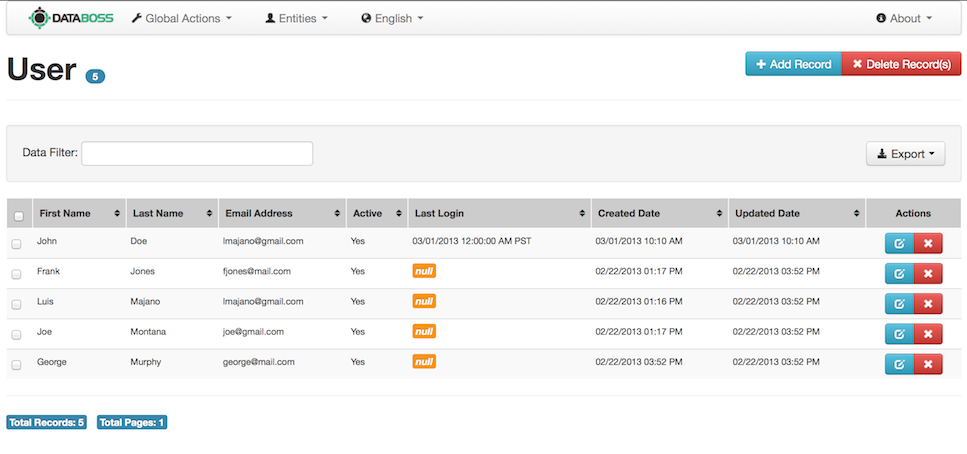
Once you install and configure DataBoss you will be able to manage your entities and relationships:
Listing
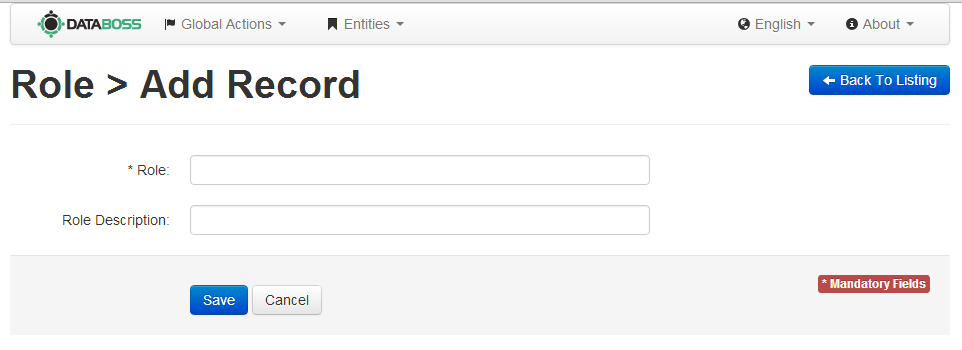
Creation
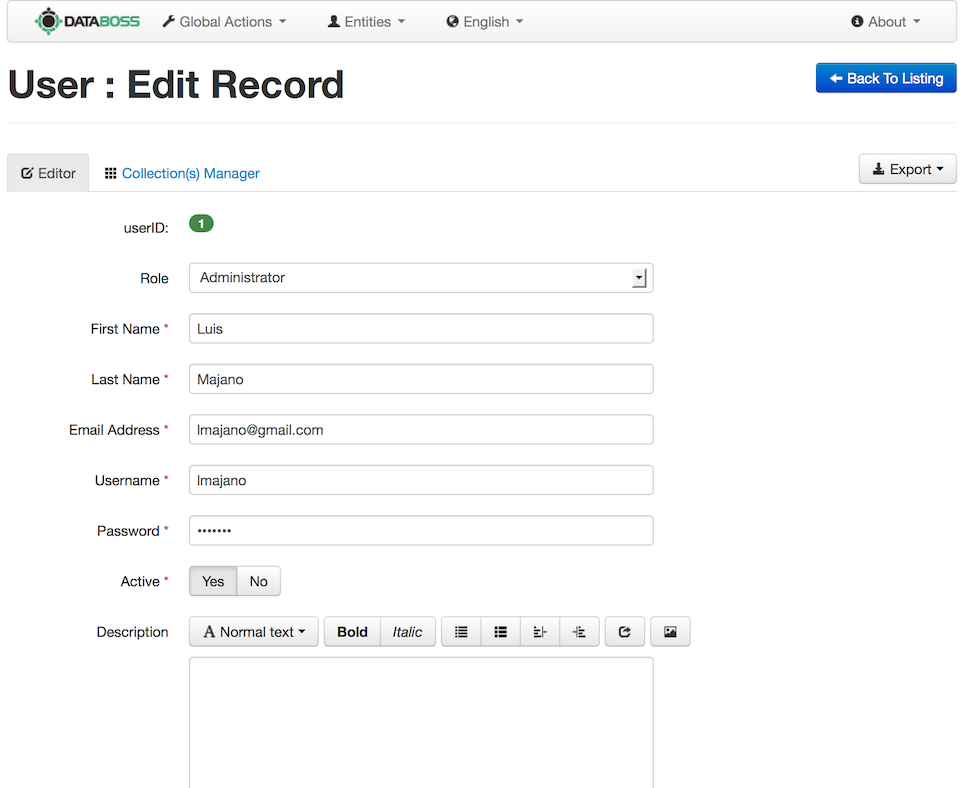
Editing
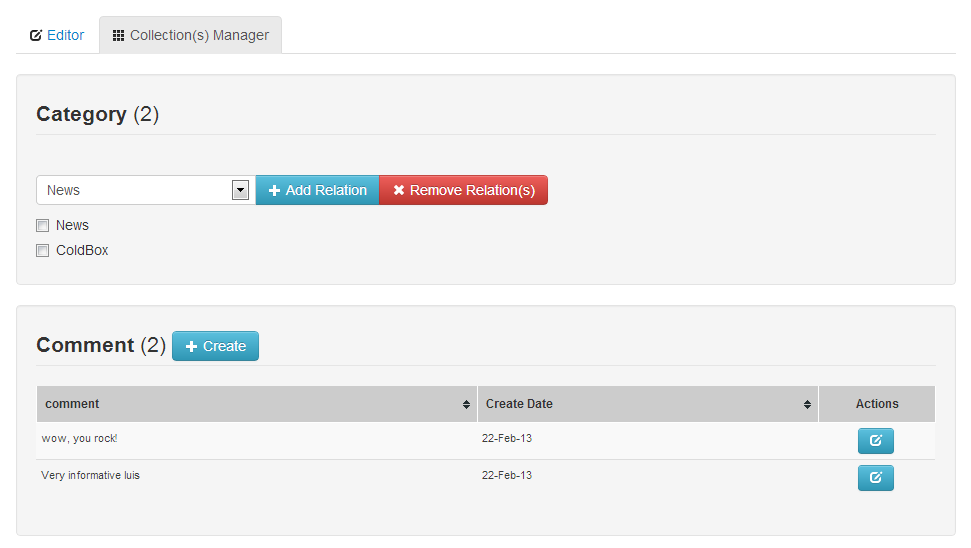
Collection Manager
Known Limitations
- Compound primary keys are not yet supported
- Marhsalling of recursive entities to Json,Xml is not supported
Installation
DataBoss can be installed in several formats and we will start describing each format below. Once the applicaiton has been deployed and installed then you can start configuring DataBoss for operation and usage.
Standalone DataBoss
DataBoss in itself is a standalone application built using the ColdBox Platform and it can be used as a shell to start writing your applications or configured to read off information from your existing application. You can deploy DataBoss as a sub-folder application or into an entire web root. This standalone application is configured to search in the model folder for all ORM entities it will manage and uses a datasource called databoss. You can start creating or dropping all the entities you would like to manage in this model folder and using the CFML administrator to create the databoss datasource. However, you can alter this behavior by changing a few properties in the Application.cfc:
- this.datasource : The datasource to connect to
- this.ormsettings.cfclocation : The relative or cfc mapping location where entities are stored
component extends="coldbox.system.Coldbox"{

	...
	// DATABOSS CBORM MODULE
	this.mappings[ "/cborm" ] = COLDBOX_APP_ROOT_PATH & "modules/databoss/modules/cborm";
	// ORM SETTINGS: CONFIGURE TO YOUR LIKING
	this.ormEnabled 	  = true;
	// CHOOSE THE DATASOURCE YOU WANT DATABOSS TO MANAGE
	this.datasource		  = "databoss";
	this.ormSettings	  = {
		// THIS IS WHERE YOUR ORM ENTITIES ARE LOCATED, FILL OUT TO YOUR LIKING
		cfclocation=[ "model" ],
		//dbcreate 	= "dropcreate",
		//dialect 	= "MySQLwithInnoDB",
		// ORM SESSION MANAGEMENT SETTINGS, PLEASE DO NOT ALTER
		logSQL 				= true,
		flushAtRequestEnd 	= false,
		autoManageSession	= false,
		// ORM EVENTS, PLEASE DO NOT ALTER
		eventHandling 		= true,
		eventHandler		= "cborm.models.EventHandler"
	};

	....

}
Note: This standalone mode is great for starting new projects or using it just to manage ORM entities as a private administrator.
Once installed then just visit your sub-folder or your webroot via your browser and start working with DataBoss. Once you got the home page visible you can now start building your ORM entities and DataBoss will manage them for you.
Sample DataBoss Home
Warning : Please note that DataBoss needs ORM entities to manage, so unless there are entities in the system, DataBoss will not be operational.

No Entities Home Screenshot
Existing Application
If you already have an existing ORM CFML application you can drop-in the DataBoss standalone application into a desired sub-folder of this application, for example a folder called databoss or admin. After deploying the application you will now need to configure the DataBoss Application.cfc so it can connect itself with the existing application and also to configure the ORM properties and locations.
Shared Scopes
By default, DataBoss runs under a different application namespace but you can integrate them both by making the this.name property the same as your existing application. Below is the DataBoss Application.cfc source code where you can alter the this.name property to match your application's name. Let's say the name of your application is called MyFantasticApp:
component extends="coldbox.system.Coldbox"{

	// Application CFC Properties
	this.name = "MyFantasticApp";
	this.sessionManagement = true;
	this.sessionTimeout = createTimeSpan(0,0,30,0);
	this.setClientCookies = true;

	// ColdBox Settings
	COLDBOX_APP_ROOT_PATH = getDirectoryFromPath( getCurrentTemplatePath() );

	// DATABOSS LOCALIZED MAPPING
	this.mappings["/myapp"] = COLDBOX_APP_ROOT_PATH;
	// DATABOSS CBORM MODULE
	this.mappings[ "/cborm" ] = COLDBOX_APP_ROOT_PATH & "modules/databoss/modules/cborm";

	// ORM SETTINGS: CONFIGURE TO YOUR LIKING
	this.ormEnabled 	  = true;
	// CHOOSE THE DATASOURCE YOU WANT DATABOSS TO MANAGE
	this.datasource		  = "databoss";
	this.ormSettings	  = {
		// THIS IS WHERE YOUR ORM ENTITIES ARE LOCATED, FILL OUT TO YOUR LIKING
		cfclocation=[ "model" ],
		//dbcreate 	= "dropcreate",
		//dialect 	= "MySQLwithInnoDB",
		// ORM SESSION MANAGEMENT SETTINGS, PLEASE DO NOT ALTER
		logSQL 				= true,
		flushAtRequestEnd 	= false,
		autoManageSession	= false,
		// ORM EVENTS, PLEASE DO NOT ALTER
		eventHandling 		= true,
		eventHandler		= "cborm.models.EventHandler"
	};

	....

}
Important : If you name the applications the same, then DataBoss will inherit the application's session, security, and application scopes, so they can be shared within DataBoss.
This application integration can be done if you want DataBoss to be able to share session and application scopes. If you want them separate, then leave the this.name property unchanged.
Shared ORM
The next installation step is to tell DataBoss where to look for the entities to manage and to what datasource it should connect to. You will do this by changing the this.ormSettings.cfclocation and the this.datasource properties in the Application.cfc. Let's say you drop DataBoss in a sub-folder called admin and the ORM entities are located in the parent applications cfc/entities folder.
...

// ORM SETTINGS: CONFIGURE TO YOUR LIKING
this.ormEnabled 	  = true;
// CHOOSE THE DATASOURCE YOU WANT DATABOSS TO MANAGE
this.datasource		  = "MyDSN";

this.ormSettings	  = {
	// THIS IS WHERE YOUR ORM ENTITIES ARE LOCATED, FILL OUT TO YOUR LIKING
	cfclocation=[ "../cfc/entities" ],
	//dbcreate 	= "dropcreate",
	//dialect 	= "MySQLwithInnoDB",
	// ORM SESSION MANAGEMENT SETTINGS, PLEASE DO NOT ALTER
	logSQL 				= true,
	flushAtRequestEnd 	= false,
	autoManageSession	= false,
	// ORM EVENTS, PLEASE DO NOT ALTER
	eventHandling 		= true,
	eventHandler		= "cborm.models.EventHandler"
};

....
Note: You can use ColdFusion mappings or relative locations to discover your ORM entities as well.
Once you finished the configurations you can visit the sub-folder to startup DataBoss so you can start managing your entities.
ColdBox Module
DataBoss can also be installed as a ColdBox Module into ANY ColdBox 5+ application and above. Once deployed you will need to make sure you are deploying the module into an already ORM enabled application. DataBoss leverages the datasource and entities that are defined in the application's ORM settings. However, DataBoss relies on isolated transactions so you will have to make sure that you have at least the following settings in your this.ormsettings:
- flushAtRequestEnd = false : Make sure flusing is not enabled automatically for your application
- autoManageSession = false : Make sure automatic session management is not enabled automatically for your application
component extends="coldbox.system.Coldbox"{

	...

	// ORM SETTINGS: CONFIGURE TO YOUR LIKING
	this.ormEnabled 	  = true;
	// CHOOSE THE DATASOURCE YOU WANT DATABOSS TO MANAGE
	this.datasource		  = "databoss";
	this.ormSettings	  = {
		// THIS IS WHERE YOUR ORM ENTITIES ARE LOCATED, FILL OUT TO YOUR LIKING
		cfclocation=[ "model" ],
		//dbcreate 	= "dropcreate",
		//dialect 	= "MySQLwithInnoDB",
		// ORM SESSION MANAGEMENT SETTINGS, PLEASE DO NOT ALTER
		logSQL 				= true,
		flushAtRequestEnd 	= false,
		autoManageSession	= false,
		// ORM EVENTS, PLEASE DO NOT ALTER
		eventHandling 		= true,
		eventHandler		= "cborm.models.EventHandler"
	};

	....

}
Once the module is installed and your application is restarted or started for the first time you will be able to access DataBoss using the /databoss entry point:
-- With SES
https://localhost/index.cfm/databoss

-- With rewrites
https://localhost/databoss
Sample DataBoss Home
setAutoReload(true) is NOT used in your application's routes.cfm file.
This causes conflicts with module routing and will make all module routes to not be loaded.
Configuration
DataBoss has some configuration settings that can alter its behavior and you do this in our configuration file that can be located at /modules/databoss/config/Databoss.json.cfm.
Note : The JSON file is actually a cfm extension so it cannot be viewed or executed for security purposes
{
	"licenseKey" : "",
	"licenseEmail" : "",
	"pagingMaxRows" : 20,
	"pagingBandGap" : 5,
	"supportedLanguages" : 	["en_US", "es_CO", "de_DE", "fr_FR", "pt_BR", "it_IT"],
	"defaultLocale"	: "en_US",
	"debugMode" : false,
	"showLanguageOptions" : true,
	"showGlobalActions" :	true,
	"showLogo" : true,
	"showAbout" : true,
	"listingMaxChars" : 100,
	"jsonpcallback" : "",
	"basicAuthentication" : {
		"enabled" : false,
		"username" : "admin",
		"password" : "databoss"
	},
	"logging" : {
		"enabled" 	: true,
		"levelMin" 	: "fatal",
		"levelMax" 	: "info"
	},
	"entitiesExcept" : [],
	"entitiesOnly" : []
}
From here you will be able to configure the following settings:
| Setting | Type | Default | Description |
|---|---|---|---|
| licenseKey | string | --- | The license key for your application provided at purchase time |
| licenseEmail | string | --- | The email you used to purchase your application license |
| basicAuthentication | struct | { enabled=false } | Enables/disables DataBoss basic authentication |
| defaultLocale | locale | en_US | The locale to use for the default language of the UI. The available locales are: en_US, es_CO, de_DE, fr_FR, pt_BR, it_IT |
| debugMode | boolean | false | Dumps some metadata for you in the UI for debugging purposes |
| entitiesExcept | array | [] | An array of names of entities to exclude from management |
| entitiesOnly | array | [] | An array of names of entities to ONLY manage |
| jsonpcallback | string | --- | The JSONP callback when exporting data |
| listingMaxChars | numeric | 100 | Limit the number of characters displayed in the listing cells |
| logging | struct | { enabled=true } | Enables/disables DataBoss file logging for debugging purposes |
| PagingBandGap | numeric | 5 | The number of pages to show before our pagination carrousel moves |
| PagingMaxRows | numeric | 20 | How many rows to show before pagination is used |
| showAbout | boolean | true | Shows the about navigation bar in the UI. Multi-Project Only! |
| showGlobalActions | boolean | true | Shows the global actions navigation bar in the UI |
| showLanguageOptions | boolean | true | Shows the language navigation bar in the UI |
| showLogo | boolean | true | Shows the logo in the navigation bar UI. Multi-Project Only! |
| supportedLanguages | array | ["en_US", "es_CO", "de_DE", "fr_FR", "pt_BR", "it_IT"] | This lists the available languages to offer for the UI |
License Activation
Once the module is installed you will need to install your application license key and email information into the licenseKey and licenseEmail settings.
{
	"licenseKey" : "",
	"licenseEmail" : ""
}
Important: Please note that DataBoss is licensed on a per application or multi-project basis, so each module installation must contain the license key and the email used to purchase the license in order to activate your module.
Once the module is installed and your application is restarted or started for the first time you will be able to access all of the profiling information via the FusionReactor administration console. ProfileBox will also register a notification that it is up and running.
Logging
DataBoss leverages LogBox for file logging in case you have issues with your setup. By default logging is enabled and points to the folder:
/{installation}/modules/databoss/logs
You can alter the logging using the JSON properties we just discovered and the settings below:
| Setting | Type | Default | Description |
|---|---|---|---|
| enabled | boolean | true | Enable or not file logging |
| levelMin | string | fatal | The minimum logging level: [FATAL, ERROR, WARNING, INFO, DEBUG] |
| levelMax | string | info | The maximum logging level: [FATAL, ERROR, WARNING, INFO, DEBUG] |
Important : You can change the levelMax setting to debug to enable debug tracers within DataBoss in case you have issues or want to see metadata information about your entities.
Security
DatBoss will need to be secured by your parent application where it has been deployed to. However, we also provide a basic authentication mechanism that can be configured via the configuration file:
{
	...

	"basicAuthentication" : {
		"enabled" : true,
		"username" : "admin",
		"password" : "databoss"
	}
}
Once you switch the enabled flag to true, the entire interface will be secured with basic authentication. It will then be your choice of username and password to be configured so users can then interact with DataBoss.

Standalone Security Flags
If you will be running DataBoss as a standalone application then we would recommend that you change the default debugging and reiniting password for the application. These settings can be found in the file: /config/Coldbox.cfc and are defaulted as seen below:
debugPassword  = "databoss",
reinitPassword = "databoss",
Note: These flags are used internally by the ColdBox framework to enable application debugging panels and also to reinitialize the application to a first request basis.
Usage
Once you have installed DataBoss and you have some ORM entities to manage, the DataBoss module or application can be executed. You will now be able to manage your ORM entities and their relationships in our default discovery manner. However, you can customize the UI and relationships via our special property and component annotations, and also the type of validation each entity will be assigned.
i18n
DataBoss comes as a completely internationalized application in the following languages:
- English
- Spanish
- German
- Portugues
- French
- Italian
You can change the default locale language by opening the DataBoss configuration file under /modules/databoss/config/Databoss.json.cfm and changing the defaultLocale setting.
{
	"supportedLanguages" : 	["en_US", "es_CO", "de_DE", "fr_FR", "pt_BR", "it_IT"],
	"defaultLocale"	: "en_US",
	"showLanguageOptions" : true
}
You can also change languages on the fly by using the languages pull down from the navigation bar.

Note: DataBoss i18n capabilities will also adhere and respect the parent's application's i18n locale as well.
Validation
DataBoss leverages ColdBox Validation to provide server and client side validation for your application. DataBoss by default will inspect the ORM entity information for validation rules and it will create them for you on the fly.

It will then validate in the server and also in the client via HTML5 validation. However, you can also create standard ColdBox Validation constraints in your ORM entities and DataBoss will validate using those constraints instead. Below is the validation discovery workflow:
- Does the entity have an isValid() method?
- Yes: DataBoss assumes this is a ColdBox Active Entity and validates accordingly.
- Does the entity have a this.constraints structure of rules?
- Yes: DataBoss will use those rules for validation according to ColdBox Validation
- Else, DataBoss will build an automatic custom constrainsts rules structure for you, according to Hibernate ORM Metadata
Here is an example of some custom rules placed within the ORM entity:
component persistent="true"{

	// Object properties
	property name="id" fieldtype="id" generator="native" setter="false";
	property name="fname";
	property name="lname";
	property name="email";
	property name="username";
	property name="password";
	property name="age";

	// Custom ColdBox Validation
	this.constraints = {
		fname = { required = true },
		lname = { required = true },
		username = { required=true, size="6..10", unique=true },
		password = { required=true, size="6..8" },
		email = { required=true, type="email" },
		age = { required=true, type="numeric", min=18 }
	};
}
Entity Annotations
You can annotate or add extra metadata to your ORM entity component tag or declaration for the following purposes:
- What propert or properties in this entity will be used for listing sorting
- What display name to use for the entity on all DataBoss UI elements
You will accomplish this using the following annotations:
| Annotation | Type | Default | Description |
|---|---|---|---|
| displayName | string | Entity name | The display name to use on all UI elements. By default it uses the name of the entity. |
| db_sortBy | string | ID | The sorting string to use for listing the ORM entity data. This can be a single property or an entire sorting string. This annotation is also used to sort and display MANY-TO-MANY collections |
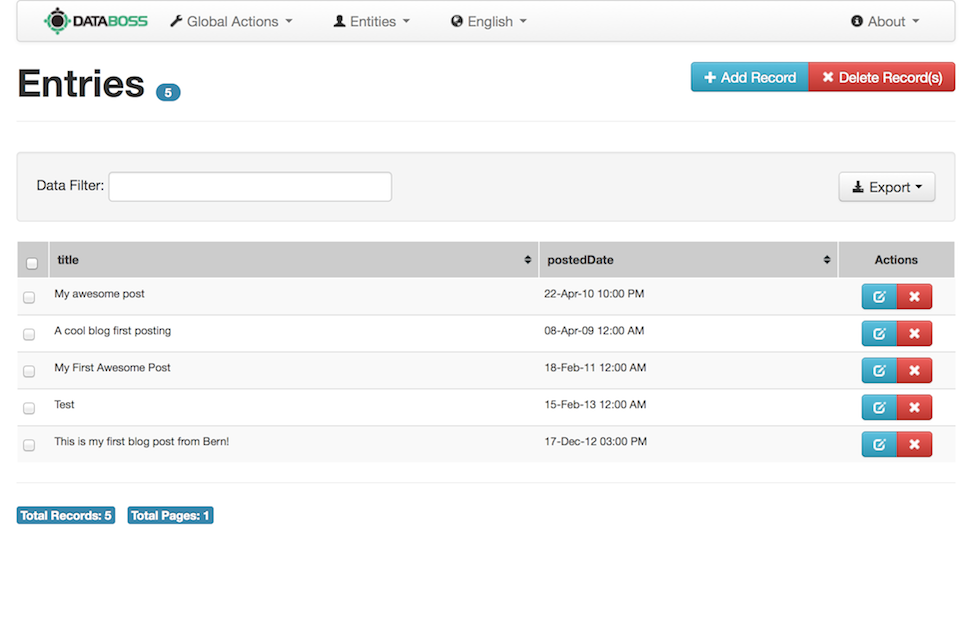
The following example adds sorting using a complex ORM directive and a nice display name:
// Script Based
component persistent="true" displayName="Entries" db_sortBy="title, postedDate asc"{
	...
}

// Tag Based
<cfcomponent persistent="true" displayName="Entries" db_sortBy="title, postedDate asc">
	...
</cfcomponent>

The following example shows you where the displayName is used in the UI and the code:
// Script Based
component persistent="true" entityName="entry" displayName="BlogEntry" db_sortBy="title"{

}

// Tag Based
<cfcomponent persistent="true" entityName="entry" displayName="BlogEntry" db_sortBy="title">
	...
</cfcomponent>

Property Anotations
You can also annotate the ORM entity properties for the following purposes:
- Choose the HTML 5 Control
- Display the property in the listing panels or not
- HTML5 regex validation
- Display custom label texts
- Display custom help texts
- Limit a UI value length
- Designate the property columns to use for displaying relationships
- Assigning default values to properties
- Adding placeholders to input elements
- Display or not the property in the creation/update forms
Below is a chart of the annotations or extra attributes you can add to the property or cfproperty code to enhance it with DataBoss.
| Annotation | Type | Default | Description |
|---|---|---|---|
| db_html | string | text | The HTML 5 control to use. Available controls are:
|
| default | any | null | This is used for ORM purposes and if you setup a default value for a property we will display it in the create forms only. |
| db_placeholder | string | --- | Adds a placeholder attribute to the HTML input element only. |
| db_validate | regex | --- | The JS regex pattern to apply for HTML 5 client side validation |
| db_helpText | string | --- | The text to use in the DataBoss UI help labels |
| db_labelText | string | {property name} | The label text to use in the UI. By default it uses the property name |
| db_maxLength | numeric | --- | The length to limit the UI control with via HTML 5 validation and ColdBox server side validation. If your entity defines a length attribute, then DataBoss will use that value instead. |
| db_displayColumns | property name(s) | {primaryKey} | A list of columns to display on singular relations (One-To-One, Many-To-One) when building the create and update forms. Defaults to primary key values unless defined. Can be a dot-delimited path to get deep properties from composite entities. |
| db_dateformat | valid CFML/JS formatting | --- | A valid date formatting pattern for usage in listings and editors.
|
| db_options | list | --- | A comma-delimitted list of options to show in a dropdown for this field |
| db_optionsUDF | string | --- | The name of a UDF in the entity that MUST return an array of options to display in a select control |
| db_display | boolean | true | Display the property in the data grids created for the entity listing |
| db_displayCreate | boolean | true | Display the property field in the creation forms |
| db_displayUpdate | boolean | true | Display the property field in the update forms |
| db_showDate | boolean | true | Displays the date portions of date/time fields in the listings |
| db_timeformat | valid CFML formatting | --- | A valid time formatting pattern for usage in listings and editors. |
| db_showTime | boolean | true | Displays the time portions of date/time fields in the listings |

Labels & Help Text

Some UI Controls
Here are some examples of using these attributes in your entity properties:
// User Entity
property name="firstName" db_labelText="First Name" placeholder="John";
property name="lastName" db_labelText="Last Name" placeholder="Doe";
property name="dob" ormtype="date" db_labelText="Date of Birth" db_showTime="false" db_dateFormat="dd/mm/yyyy";
property name="dobTime"  db_labelText="Time of Birth";
property name="username" db_labelText="Username" db_helpText="(Required Size: 5-8)";
property name="password" db_labelText="Password" db_html="password" db_helpText="(Required Size: 5-8)";
property name="lastLogin" ormtype="date" db_labelText="Last Login" db_timeformat="full" db_dateformat="dd/mm/yyyy";
property name="isActive" db_labelText="Active" ormtype="boolean" dbdefault="true" default="true";
property name="favoriteColor" db_labelText="Favorite Color:" db_options="red,white,blue,green";
property name="favoriteColor2" db_labelText="Favorite Color:" db_optionsUDF="getColors";

array function getColors(){
	return [ "red", "white", "green", "black" ];
}

// Entry Entity
property name="entryBody" db_html="richtext";
property name="title";
property name="postedDate" ormtype="timestamp" update="false";
property name="user" fieldtype="many-to-one" fkcolumn="FKuser_id" cfc="BlogUser" db_displayColumns="firstName,lastName";

// Comment Entity
property name="commentID" column="comment_id" fieldtype="id" generator="uuid";
property name="comment" db_html="textarea";
property name="time" ormtype="timestamp" db_labelText="Create Date";
property name="entry" fieldtype="many-to-one" cfc="Entry" fkcolumn="FKentry_id" db_DisplayColumns="title";
Note: The select, radio and toggle HTML controls only affect boolean properties.
Display Columns
The db_displayColumns attribute is used mostly to represent many-to-one relationships in a drop down. By default, DataBoss will present a drop down of primary keys for that relationship, but that is not really that useful. You can use this attribute to have 1 or more properties you would like to display in the drop down that relate to that entity. For example, we have our Comment entity that has a relationship back to an Entry entity and we want to show in the drop down the title of the entry.
property name="entry" fieldtype="many-to-one" cfc="Entry" fkcolumn="FKentry_id" db_DisplayColumns="title";
Then you can get a UI like this:

Display Column
You can drill down into composed objects to reference a "deep" propery with a dot-delimited list such as "company.name" which would return the name property of the company property. There is no limit to how far down you can reach as long as you are traversing singular relationships.
property name="user" fieldtype="many-to-one" cfc="User" fkcolumn="FKuser_id" db_DisplayColumns="company.name";
This can be useful if you need to display details about any entity which is mostly comprised of relationships and has few useful properties of its own.
Field Options
You can easily tell DataBoss that a certain text field should only show a select box with available options. You will do this by using the db_options & db_optionsUDF annotations.
property name="favoriteColor" db_labelText="Favorite Color:" db_options="red,white,blue,green";
property name="favoriteColor2" db_labelText="Favorite Color:" db_optionsUDF="getColors";

array function getColors(){
	return [ "red", "white", "green", "black" ];
}
- The db_options is a simple list of options that the user will be presented with.
- The db_optionsUDF is the name of a function in the same entity that must return an array of options.
Working With Date/Time Fields
Please refer to the property annotations to learn how to display and format date/time fields. By default DataBoss will try to render out both date and times using default date and time formats but you have complete control of the formatting masks and if you want to display the date and/or time fields.


Date/Time Pickers
| Annotation | Type | Default | Description |
|---|---|---|---|
| db_html | date, time, or datetime | --- |
|
| db_dateformat | valid CFML formatting | --- | A valid date formatting pattern or shortcut: short, medium, long, full used in listings |
| db_showDate | boolean | true | Displays the date portions of date/time fields in the listings |
| db_timeformat | valid CFML formatting | --- | A valid time formatting pattern or shortcut: short, medium, long, full used in listings |
| db_showTime | boolean | true | Displays the time portions of date/time fields in the listings |
property name="dob" ormtype="date" db_labelText="Date of Birth" db_showTime="false" db_dateFormat="dd/mm/yyyy";
property name="postedDate" ormtype="timestamp" update="false" db_timeformat="full";
property name="time" ormtype="timestamp" db_labelText="Create Date" db_dateformat="full" db_timeformat="full";
property name="dobTime" ormtype="string" db_labelText="Time of Birth";
Non-Editable Properties
DataBoss will NOT allow certain type of properties to be editable or even creatable due to their ORM nature.
- id : Auto-generated primary keys
- version : Version auto properties
- formula : Formula generated properties
- update=false : Property tagged as non updatable
- insert=false : Property tagged as non insertable
// Insert false
property name="lastLogin" ormtype="date" db_labelText="Last Login" insert="false";

// Calculated Fields
property name="numberOfPermissions" formula="select count(*) from cb_rolePermissions as rolePermissions where rolePermissions.FK_roleID=roleID";
property name="numberOfUsers" 	formula="select count(*) from user as user where user.FK_roleID=roleID";

// Update false
property name="postedDate" ormtype="timestamp" update="false";
property name="updatedDate" ormtype="timestamp" sqltype="timestamp" insert="false" update="false";

Non-Editable Properties
Automatic UI Controls
Some properties will be assigned automatic UI controls once they are discoverd by DataBoss. You can override or get more granular control by using the db_html property annotation we learned about before.
| Property Type | Control |
|---|---|
| date,timestamp | Date Picker |
| string | Text |
| boolean | Toggle Buttons |
Field Order
DataBoss will order the create and edit form fields in the order they are declared in the entity CFC. So if you want a specific field to exist above or below another field you will just need to order the properties in that way. Let's say we have a user entity and we want to display the fields in this order:
- userID
- firstName
- lastName
- username
- password
- isActive
- description
Then we can have the following entity code:
component persistent="true" table="user" displayName="User" db_sortBy="lastName"{

	// Properties
	property name="userID" 		fieldtype="id" generator="native" setter="false";
	property name="firstName"	length="100" notnull="true" db_labelText="First Name";
	property name="lastName"	length="100" notnull="true" db_labelText="Last Name";
	property name="email"		length="255" notnull="true" db_html="email" db_labelText="Email Address";
	property name="username"	length="100" notnull="true" unique="true" db_labelText="Username" db_display="false";
	property name="password"	length="100" notnull="true" db_labelText="Password" db_html="password" db_display="false" db_displayCreate="false";
	property name="isActive" 	ormtype="boolean"   notnull="true" default="false" dbdefault="0" db_labelText="Active";
	property name="description" ormtype="text" notnull="false" db_labelText="Description" db_html="richtext";

	// M20 -> Role
	property name="role" notnull="true" fieldtype="many-to-one" cfc="Role" fkcolumn="FK_roleID" lazy="true" db_labelText="Role" db_displayColumns="Role";

	...
}

Field Order
Note : Singular relations (One-to-One and Manty-to-One) are always shown first.
RESTFul Exports
DataBoss already enables you to export your data in either JSON, JSONP, XML, WDDX or PDF from any view listing or from any entity editor. You can either use the buttons provided in the UI or the following URL routes for exporting data from DataBoss as a full fledged RESTFul API.
Mementifier
Databoss comes with the latest ColdBox Mementifier module which will allow you to convert the state of entities to native arrays of structs and then to JSON or XML.
Please refer to the mementifier information to spice up the marshalling of your entities. The basics are that you will create a this.memento struct in your entities. Then you will add the following
configuration elements to decide what is marshalled by default, what's excluded, what's never included, property defaults and even method conversions.
this.memento = {
	// An array of the properties/relationships to include by default
	defaultIncludes = [],
	// An array of properties/relationships to exclude by default
	defaultExcludes = [],
	// An array of properties/relationships to NEVER include
	neverInclude = [],
	// A struct of defaults for properties/relationships if they are null
	defaults = {},
	// A struct of mapping functions for properties/relationships that can transform them
	mappers = {}
}
By default, mementifier will marshall ALL properties from an entity including their relationships.
Listing Exports

Listing RESTful Export
The listing export uses the following RESTful route:
// With Format in URL
/databoss/entity/:entity/export/:format

// With Format as Extension (if enabled)
/databoss/entity/:entity.(json|jsonp|xml|wddx|pdf)
Here are some examples:
// With Format in URL
/databoss/entity/user/export/json
/databoss/entity/roles/export/json
/databoss/entity/roles/export/jsonp
/databoss/entity/entries/export/xml
/databoss/entity/entries/export/wddx

// With Format as Extension (if enabled)
/databoss/entity/user.json?page=4&excludes=role,permissions
/databoss/entity/user.jsonp
/databoss/entity/user.xml
/databoss/entity/user.wddx
/databoss/entity/user.pdf
Placeholders
With this route, you will be able to export your view listings for any entity in JSON, JSONP, XML, WDDX or PDF. The following are the placeholder options:
| Placeholder | Description |
|---|---|
| :entity | The name of the entity to target |
| :format | The format to export to: JSON, JSONP, XML, WDDX or PDF. This can also be used via the extensions. |
Parameters
This RESTful route also has some URL parameters that you can add as either name-value pairs or normal URL params:
| Annotation | Type | Default | Description |
|---|---|---|---|
| page | numeric | 1 | The pagination window to return of records. By default it returns as many records as you have defined in your configuration file. |
| includes | string | --- | A list of properties to include in the export (json,jsonp,xml,wddx) |
| excludes | string | --- | A list of properties to exclude in the export (json,jsonp,xml,wddx) |
| ignoreDefaults | boolean | false | Ignore mementifier defaults and ONLY use the incoming includes and excludes (json,jsonp,xml,wddx) |
// With Format in URL
/databoss/entity/entries/export/xml/page/2
/databoss/entity/entries/export/xml?page=2&includes=id,name&ignoreDefaults=true

// With Format as Extension (if enabled)
/databoss/entity/user.json?page=2
/databoss/entity/user.jsonp?page=2
Entity Export
You can also have RESTFul exports for a specific entity

Listing RESTful Export
The entity export uses the following RESTful route:
// With Format in URL
/databoss/entity/:entity/id/:id/format/:format

// With Format as Extension (if enabled)
/databoss/entity/:entity/id/:id.(json|jsonp|wddx|xml|pdf)
Here are some examples:
// With Format in URL
/databoss/entity/user/id/2/export/json
/databoss/entity/roles/id/3234/export/json
/databoss/entity/user/id/2/export/wddx
/databoss/entity/user/id/2/export/jsonp

// With Format as Extension (if enabled)
/databoss/entity/user/id/2.json
/databoss/entity/user/id/234234.xml
/databoss/entity/user/id/2234.pdf
Placeholders
With this route, you will be able to export your view listings for any entity in JSON, XML or PDF. The following are the placeholder options:
| Placeholder | Description |
|---|---|
| :entity | The name of the entity to target |
| :id | The primary key identitifer of the entity |
| :format | The format to export to: JSON, JSONP, XML, WDDX or PDF. This can also be used via the extensions. |
Parameters
This RESTful route also has some URL parameters that you can add as either name-value pairs or normal URL params:
| Annotation | Type | Default | Description |
|---|---|---|---|
| includes | string | --- | A list of properties to include in the export (json,jsonp,xml,wddx) |
| excludes | string | --- | A list of properties to exclude in the export (json,jsonp,xml,wddx) |
| ignoreDefaults | boolean | false | Ignore mementifier defaults and ONLY use the incoming includes and excludes (json,jsonp,xml,wddx) |
DataBoss Actions
DataBoss has some control actions that can help you as you build and configure your ORM entities. It is important to note that when DataBoss startups it will talk to the underlying Hibernate engine and build a metadata dictionary of every entity in the system, but it only does this at startup for performance considerations. So if you do updates to your entities you will not see them reflected unless you activate these actions:

Global Actions
| Action | Description |
|---|---|
| Reload ORM Metadata | Flushes the entire metadata map and all entities will be re-inspected for metadata. |
| Reload ORM | Issue an ORMReload() and flush the entire metadata map. |
| Reload Application | Issue an applicationStop() so the application can be re-initialized. |
Important : Reloading ORM metadata will not reflect changes like: adding, removing, moving, or updating ORM information in an entity, only DataBoss metadata. For ORM changes always use the Reload ORM action.
Reiniting Standalone App
You can also force a reinit in the application by issuing a URL action to the application using the URL variable called fwreinit:
index.cfm?fwreinit={reinitPassword}
Note : Please note that the reinitPassword can be found under the /config/Coldbox.cfc configuration file. The default password is databoss
Samples
DataBoss ships with several sample applications to guide you through the installation and usage process. They can be found under the samples directory of the distribution package.
- simple : A simple ORM Blog built with ColdBox and DataBoss
- usermanager : A role-permision user manager system
Note : For each sample you must create a datasource in your CFML engine and also create a database in your favorite database engine. Please refer to the samples readme.txt for more information.
Help & Support
If you need any help related to our DataBoss product, you can use our online help group at https://groups.google.com/a/ortussolutions.com/forum/?hl=en&fromgroups#!forum/databoss. If you need any type of custom consulting or support package hours, please contact us at consulting@ortussolutions.com or visit us at www.ortussolutions.com.